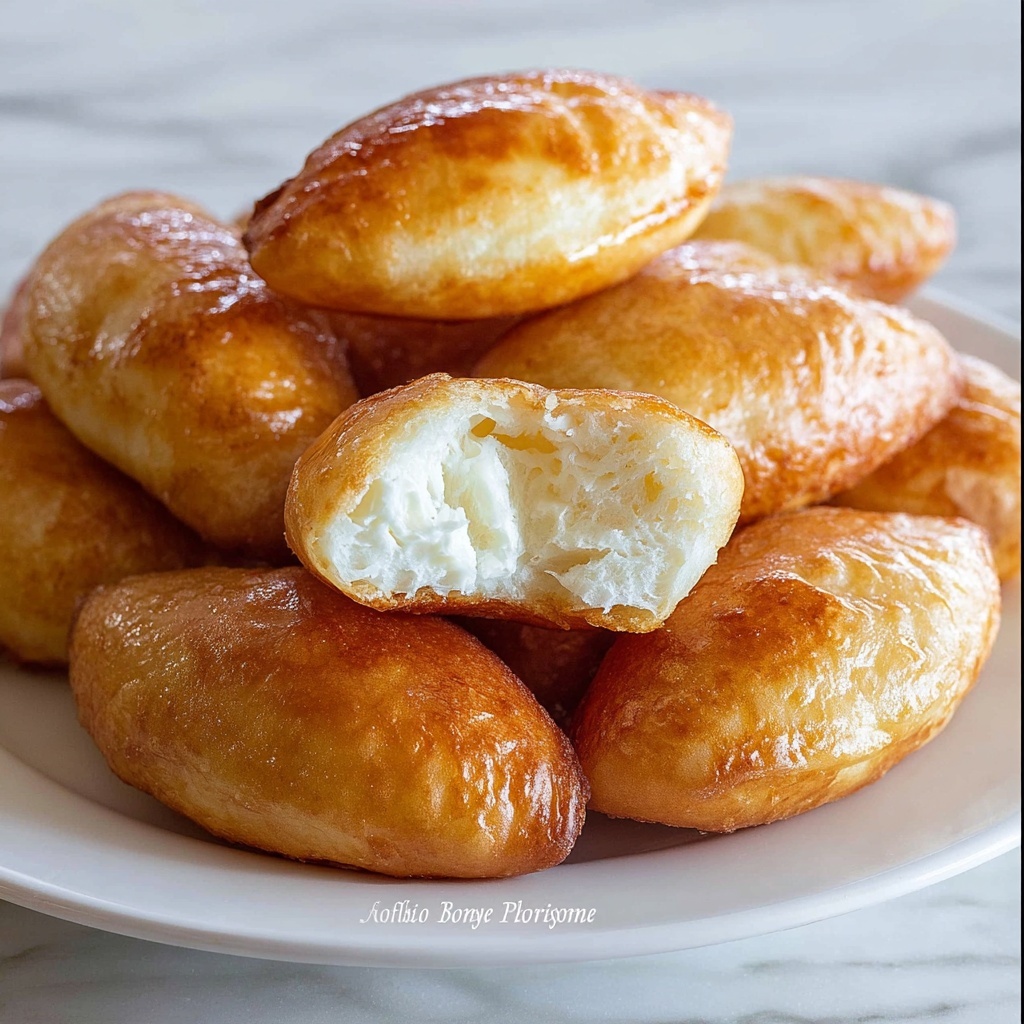
If you have been searching for a comforting, flavorful treat that truly hits home, then look no further than The Best Piroshki Recipe Ever Recipe. These soft, golden pockets of dough stuffed with savory, sweet, or vegetarian fillings are little bites of pure joy. Each piroshki wraps layers of rich tradition and simple, satisfying ingredients that combine to create a snack, appetizer, or meal that everyone will rave about. Whether you’re craving the classic meat filling, creamy mashed potatoes with cheese, or a sweet preserve surprise, this recipe is a timeless crowd-pleaser you’ll want to make again and again.
The Ingredients You’ll Need
Ingredients You’ll Need
The magic of The Best Piroshki Recipe Ever Recipe lies in its beautifully straightforward ingredients. Each one plays a starring role in creating the soft dough, flavorful filling, and perfect golden finish that make every bite irresistible.
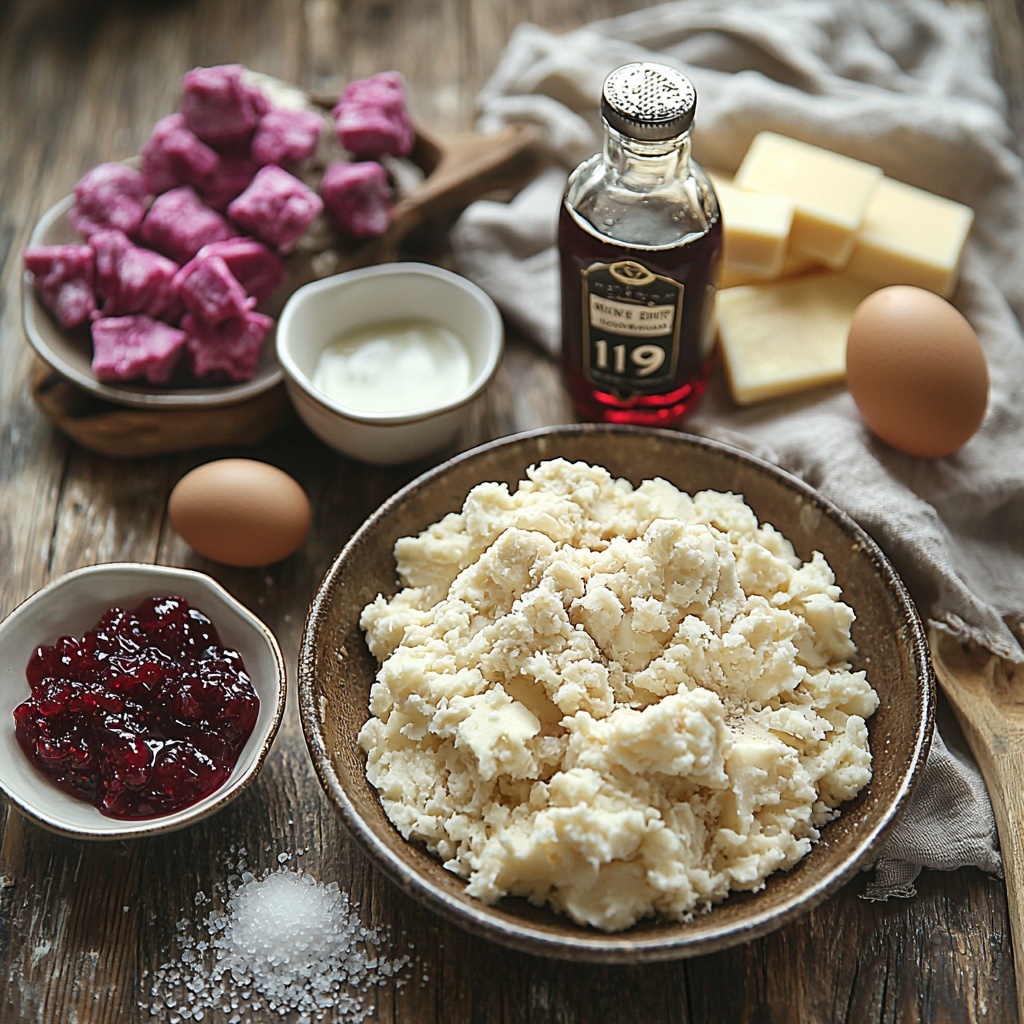
- 4 cups all-purpose flour: Forms the soft and chewy base of the dough that holds all the delicious fillings.
- 1 cup warm milk: Feeds the yeast and helps create tender dough with the perfect crumb.
- 2 1/4 tsp active dry yeast (1 packet): The magic spark that makes the dough rise beautifully, giving piroshki their light texture.
- 2 tbsp sugar: Balances the savory and adds subtle sweetness to the dough for a lovely golden crust.
- 1 tsp salt: Enhances all flavors without overpowering the delicate dough.
- 1/4 cup unsalted butter, melted: Adds richness and tenderness to every bite.
- 2 eggs: Provide structure and a tender crumb, plus they help with that beautiful golden sheen when brushing.
- Oil for frying (vegetable or canola): For achieving crispy, golden exteriors if you choose to fry your piroshki instead of baking.
- Savory filling – 1 lb ground beef or pork, 1 small onion (chopped), salt & pepper: Classic hearty filling bursting with smoky, meaty flavor.
- Vegetarian filling – 2 cups mashed potatoes, 1/2 cup shredded cheese, 1/2 small onion (sautéed): Creamy, cheesy, and perfectly comforting meat-free option.
- Sweet filling – 1/2 cup fruit preserves or jam: Adds a pop of fruity sweetness that contrasts beautifully with the soft dough.
How to Make The Best Piroshki Recipe Ever Recipe
Step 1: Activate Your Yeast
Start by combining warm milk, sugar, and yeast in a large bowl. Let it sit for about 10 minutes until the mixture is foamy and bubbly. This shows your yeast is alive and ready to leaven your dough to fluffy perfection.
Step 2: Mix Wet Ingredients
Add the eggs, melted butter, and salt into the yeast mixture, mixing everything well. These ingredients give the dough richness, structure, and that warm, balanced flavor you’ll love.
Step 3: Form the Dough
Gradually stir in the flour until the dough starts coming together into a soft ball. Transfer to a floured surface and knead for 8 to 10 minutes until the dough becomes smooth and elastic—this is key for that light, pillowy texture.
Step 4: First Rise
Place your dough into a lightly greased bowl, cover it with a towel or plastic wrap, and let it rise in a warm spot for 1 to 1.5 hours. It should double in size, which means it’s ready for shaping and stuffing.
Step 5: Prepare Your Filling
While the dough is rising, get your filling ready. Whether you’re cooking savory meat with onions and seasoning, sautéing onions for the vegetarian mixture, or simply spooning out your fruit preserves, having the filling prepped is essential for smooth assembly.
Step 6: Shape the Dough
Punch down the risen dough to release air and divide it into 16 to 20 equal pieces. Flatten each piece into a circle about 4 to 5 inches wide—this will be your piroshki “pocket” waiting to be filled.
Step 7: Fill and Seal
Add 1 to 2 tablespoons of your chosen filling to the center of each dough circle. Then carefully fold the dough over and pinch the edges firmly to seal your delicious surprise inside. This step ensures no filling escapes during cooking.
Step 8: Second Rise
Place each piroshki seam-side down on a towel-lined tray and cover with a kitchen towel. Allow them to rise again for 20 to 30 minutes—this extra time helps puff them up just right before cooking.
Step 9: Cook to Golden Perfection
You can fry your piroshki in hot oil until golden brown on both sides, about 2 to 3 minutes each, for that irresistibly crispy exterior. Alternatively, brush them with an egg wash and bake at 375°F for 20 to 25 minutes. Both methods yield fantastic results—choose what suits you best!
Step 10: Serve Warm and Enjoy
Drain your cooked piroshki on paper towels if fried, let them cool slightly, and serve warm. This is the moment where all your hard work transforms into delicious smiles and happy tummies.
How to Serve The Best Piroshki Recipe Ever Recipe
Garnishes
Fresh herbs like dill or parsley sprinkled on top add a vibrant pop of color and freshness that beautifully complements the rich piroshki.
Side Dishes
Serve piroshki alongside a crisp green salad or a bowl of borscht for a traditional accompaniment that balances the heaviness and adds variety to your meal.
Creative Ways to Present
Arrange your piroshki on a beautiful platter with small bowls of sour cream, mustard, or a tangy dipping sauce. You can also turn them into mini hand-held sandwiches for parties or pair sweet versions with a scoop of vanilla ice cream for dessert.
Make Ahead and Storage
Storing Leftovers
Keep any leftover piroshki in an airtight container and store them in the refrigerator for up to 3 days. They stay soft and delicious, just be sure to warm them before eating.
Freezing
For longer storage, freeze uncooked, shaped piroshki on a baking sheet until solid, then transfer to freezer bags. You can freeze cooked piroshki as well, just wrap them well to prevent freezer burn.
Reheating
Reheat refrigerated or thawed piroshki in a 350°F oven for 10 to 12 minutes or fry lightly in a pan to restore crispness. Avoid microwaving to keep their wonderful texture intact.
FAQs
Can I use all whole wheat flour for this recipe?
While whole wheat flour is nutritious, it will change the texture and rise of The Best Piroshki Recipe Ever Recipe. It’s best to substitute up to half with whole wheat flour for a hearty twist without compromising softness.
Is it necessary to fry piroshki, or can I bake them only?
Both frying and baking work wonderfully. Frying gives a crispier crust, while baking is lighter and less oily. Choose based on your preference or dietary needs!
Can I use other fillings than the ones suggested?
Absolutely! The beauty of The Best Piroshki Recipe Ever Recipe is how adaptable it is. Try mushrooms and cheese, sauerkraut, or even sweetened cream cheese – the sky’s the limit.
Do I need to proof the yeast if I’m using instant yeast?
Instant yeast can be mixed directly with the dry ingredients, but proofing it with warm milk and sugar as described adds assurance your dough will rise perfectly every time.
How do I make these piroshki ahead for a party?
Shape and fill your piroshki the day before, then refrigerate covered overnight. Just give them a second rise and cook fresh on the day of your event for maximum freshness.
Final Thoughts
I can’t wait for you to try The Best Piroshki Recipe Ever Recipe because it’s one of those dishes that feels like a warm hug on a plate. Simple ingredients and straightforward steps come together to create something magical—whether it’s your first time making piroshki or you’ve been baking them for years. Trust me, once these golden little pockets start coming out of your kitchen, they’ll be gone faster than you expect, and you’ll be making them again in no time!
Print
The Best Piroshki Recipe Ever Recipe
- Prep Time: 1h 45m
- Cook Time: 20m
- Total Time: 2h 5m
- Yield: 16–20 piroshki
- Category: Snack, Appetizer
- Method: Frying
- Cuisine: Russian
- Diet: Halal
Description
This classic piroshki recipe offers a delicious Russian-inspired pastry filled with your choice of savory ground meat, comforting mashed potatoes with cheese, or sweet fruit preserves. The dough is soft and fluffy, made from a yeast-based mixture that rises beautifully before being stuffed, sealed, and fried to golden perfection, resulting in a crispy exterior with a tender inside. Ideal as a comforting snack or a satisfying meal, these hand pies are versatile and crowd-pleasing.
Ingredients
Dough
- 4 cups all-purpose flour
- 1 cup warm milk
- 2 1/4 tsp active dry yeast (1 packet)
- 2 tbsp sugar
- 1 tsp salt
- 1/4 cup unsalted butter, melted
- 2 eggs
Filling Options
- Savory: 1 lb ground beef or pork, 1 small onion (chopped), salt & pepper to taste
- Vegetarian: 2 cups mashed potatoes, 1/2 cup shredded cheese, 1/2 small onion (sautéed)
- Sweet: 1/2 cup fruit preserves or jam
Other
- Oil for frying (vegetable or canola)
Instructions
- Activate Yeast: Combine warm milk, sugar, and yeast in a large bowl. Let it sit for about 10 minutes until the mixture becomes foamy, indicating the yeast is active and ready.
- Mix Wet Ingredients: Add eggs, melted butter, and salt to the yeast mixture. Mix thoroughly until combined.
- Form Dough: Gradually stir in the all-purpose flour until a soft dough forms. Knead the dough on a floured surface for 8–10 minutes until it is smooth and elastic.
- First Rise: Place the dough in a lightly greased bowl, cover it, and let it rise in a warm place for 1 to 1.5 hours or until it doubles in size.
- Prepare Filling: While the dough rises, cook and season your filling of choice. For savory filling, cook ground meat with chopped onion, salt, and pepper. For vegetarian, sauté onion and mix with mashed potatoes and shredded cheese. Sweet filling is ready to use as is.
- Divide Dough: Punch down the risen dough and divide it into 16 to 20 equal pieces. Flatten each piece into a circle on a floured surface.
- Fill and Seal: Place 1–2 tablespoons of your chosen filling in the center of each dough circle. Fold the dough over and pinch edges tightly to seal and form half-moon shaped piroshki.
- Second Rise: Place the sealed piroshki seam-side down on a baking tray or plate. Cover with a towel and let rise for 20–30 minutes to slightly puff up.
- Cook Piroshki: Heat oil in a pan to medium heat and fry the piroshki for 2–3 minutes on each side until they are golden brown and cooked through. Alternatively, bake them at 375°F (190°C) for 20–25 minutes after brushing each with egg wash to achieve a golden crust.
- Drain and Serve: Remove from oil and drain on paper towels to remove excess grease. Serve warm for the best flavor and texture.
Notes
- Ensure the milk is warm, not hot, to avoid killing the yeast.
- Frying yields a crispier exterior, while baking offers a lighter option.
- Seal the edges well to prevent filling from leaking during cooking.
- Piroshki can be frozen after shaping; freeze before the second rise and cook straight from frozen, adjusting time as needed.
- Variations in filling can include mushrooms, cabbage, or sweetened cream cheese for additional flavor options.

