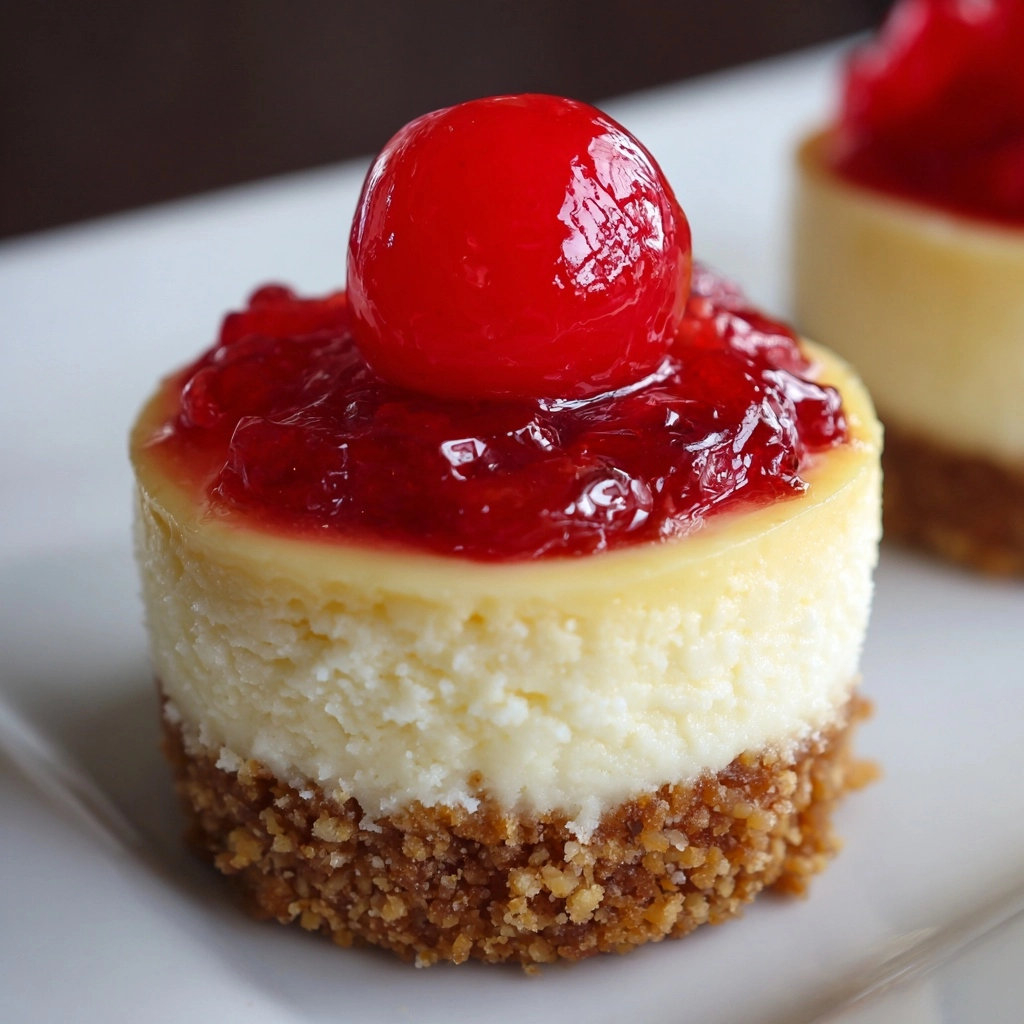
If you’re craving a delightful, bite-sized dessert that combines creamy richness with a crisp, buttery base, look no further than this Mini Cheesecakes with Vanilla Wafer Crust Recipe. These charming little cheesecakes offer a perfect balance of tangy cream cheese filling resting atop a crispy vanilla wafer crust that adds just the right amount of sweetness and texture. Whether you’re serving them at a party, gifting them to friends, or simply indulging yourself, these mini cheesecakes are sure to become a beloved favorite thanks to their approachable ingredients and irresistible flavor.

Ingredients You’ll Need
Gathering the right ingredients is half the fun, and this Mini Cheesecakes with Vanilla Wafer Crust Recipe uses simple but essential components that each bring something special to the table. From the creamy smoothness of cream cheese to the subtle crunch of vanilla wafers, every ingredient is important to achieving that perfect balance.
- Vanilla wafer cookies: These form the delicate, crispy crust that perfectly complements the smooth cheesecake filling.
- Cream cheese (softened): The star ingredient that gives these cheesecakes their rich, creamy texture and slightly tangy flavor.
- Granulated sugar: Sweetens the filling and balances the tartness of the cream cheese for a harmonious taste.
- Large eggs: Added one at a time, they help set the cheesecake while keeping it luscious and moist.
- Vanilla extract: Enhances the flavor profile, making every bite fragrant and enticing.
- All-purpose flour: Adds just enough structure to keep the mini cheesecakes from being too runny.
- Sour cream: Gives a slight tang and velvety smoothness, enriching the overall creaminess.
- Fresh fruit or pie filling (optional): The perfect topping to add freshness, color, and even more flavor contrast.
How to Make Mini Cheesecakes with Vanilla Wafer Crust Recipe
Step 1: Prepare the crust
Start by preheating your oven to 325°F and lining a 12-cup muffin tin with paper liners. Place one vanilla wafer cookie flat-side down into the bottom of each liner. This simple step forms the foundational crust that will add a delightful crunch and sweetness in every bite of your mini cheesecakes.
Step 2: Mix the cream cheese and sugar
In a mixing bowl, beat the softened cream cheese with granulated sugar until the mixture feels silky smooth and creamy. This ensures the cheesecake filling will be luscious without any lumps, setting the stage for the perfect texture.
Step 3: Add eggs and flavorings
Incorporate eggs one at a time, beating well after each addition to fully combine and avoid curdling. Then mix in vanilla extract, all-purpose flour, and sour cream until everything comes together in a glossy, smooth batter full of rich flavor.
Step 4: Fill and bake
Pour the batter evenly among the muffin cups, filling each around three-quarters full so there’s space for rising without overflowing. Bake at 325°F for about 18 to 22 minutes until the centers are just set and still have a slight jiggle, which guarantees creamy, tender cheesecake texture.
Step 5: Cool and chill
Remove the cheesecakes from the oven and let them cool in the pan for 10 minutes. Then transfer to a wire rack to cool completely before chilling them in the refrigerator for at least 2 hours. This cooling step helps the flavors meld and allows the cheesecakes to firm up perfectly.
How to Serve Mini Cheesecakes with Vanilla Wafer Crust Recipe

Garnishes
Adding a beautiful garnish elevates these mini cheesecakes from wonderful to unforgettable. Fresh berries like strawberries, blueberries, or raspberries add a juicy brightness, while spooning on a luscious dollop of pie filling or jam delivers a pop of sweetness and vivid color. A light dusting of powdered sugar or a sprig of mint can also offer that polished, bakery-style touch.
Side Dishes
While these mini cheesecakes work beautifully as stand-alone treats, pairing them with light accompaniments such as a cup of freshly brewed coffee or tea enhances the experience. For a brunch spread, consider serving alongside fresh fruit plates or crisp salads for a refreshing contrast to their creamy richness.
Creative Ways to Present
Presentation is half the fun with this Mini Cheesecakes with Vanilla Wafer Crust Recipe. Try serving them in decorative mini cupcake wrappers or on a tiered dessert stand for a playful, party-ready display. You can even create colorful layers of fruit topping to match the season or theme of your event, turning these tiny desserts into show-stopping conversation starters.
Make Ahead and Storage
Storing Leftovers
Mini cheesecakes are fantastic for making ahead. Store any leftovers in an airtight container in the refrigerator, where they will keep beautifully for up to 3-4 days without losing any of their creamy texture or flavor.
Freezing
If you want to prepare these treats well in advance, they freeze wonderfully. Simply skip adding toppings, freeze the baked and cooled mini cheesecakes in a single layer on a baking sheet until solid, then transfer to a freezer-safe container or bag. They stay fresh for up to one month, making them a convenient go-to dessert option.
Reheating
For the best texture, thaw frozen mini cheesecakes in the refrigerator overnight. There’s no need to reheat—these cheesecakes are perfect served chilled. If you prefer a slightly warmer treat, allow them to sit at room temperature for about 30 minutes before enjoying.
FAQs
Can I use a different cookie for the crust?
Absolutely! While vanilla wafer cookies provide a classic taste and texture, you can experiment with graham crackers, gingersnaps, or even shortbread cookies to customize the crust to your liking.
Do I need to use sour cream in the filling?
Sour cream adds a lovely tang and silky texture, but if you don’t have it on hand, you can substitute with Greek yogurt or even heavy cream, though the flavor and texture might be slightly different.
How do I know when mini cheesecakes are done baking?
Look for centers that are set but still have a slight jiggle—this indicates they will be creamy and soft rather than dry or overcooked. The edges should be firm and gently pulling away from the sides.
Can these mini cheesecakes be made dairy-free?
It’s a bit tricky because cream cheese is central to the recipe, but there are dairy-free cream cheese alternatives available that can work. Just be sure to choose one that can hold up well to baking for the best results.
What toppings work best for mini cheesecakes?
Fresh fruit, fruit preserves, pie fillings, whipped cream, chocolate drizzle, or crushed nuts all make fantastic toppings. Feel free to get creative and tailor the toppings to the season or your guests’ preferences.
Final Thoughts
This Mini Cheesecakes with Vanilla Wafer Crust Recipe is one of those delightful treats that bring joy with every bite and simplicity with every step. Whether you’re a seasoned baker or just starting out, these mini cheesecakes will impress and satisfy your dessert cravings without a fuss. I wholeheartedly encourage you to dive in, make a batch, and share these sweet, creamy morsels with friends and family—you’ll wonder how you ever lived without them!
Print
Mini Cheesecakes with Vanilla Wafer Crust Recipe
- Prep Time: 15 minutes
- Cook Time: 20 minutes
- Total Time: 2 hours 35 minutes
- Yield: 12 mini cheesecakes
- Category: Dessert
- Method: Baking
- Cuisine: American
- Diet: Vegetarian
Description
Delight in these creamy Mini Cheesecakes with a crunchy vanilla wafer crust, perfect individual desserts that combine smooth cream cheese filling with a sweet, crisp base. Easy to make and ideal for parties or a sweet treat, topped with fresh fruit or your favorite pie filling.
Ingredients
Crust
- 12 vanilla wafer cookies
Filling
- 16 oz cream cheese, softened
- 2/3 cup granulated sugar
- 2 large eggs
- 1 teaspoon vanilla extract
- 1 tablespoon all-purpose flour
- 1/4 cup sour cream
Toppings (optional)
- Fresh fruit or pie filling
Instructions
- Preheat and prepare muffin tin: Preheat your oven to 325°F (163°C) and line a 12-cup muffin tin with paper liners to prevent sticking and facilitate easy removal.
- Make crust: Place one vanilla wafer cookie flat-side down into the bottom of each paper liner; this will form the crunchy, sweet crust base for each mini cheesecake.
- Beat cream cheese and sugar: In a mixing bowl, beat the softened cream cheese and granulated sugar together until the mixture is creamy and smooth without lumps for a silky filling.
- Add eggs: Add the eggs to the cream cheese mixture one at a time, beating well after each addition to ensure full incorporation and a smooth batter.
- Mix in flavorings and flour: Stir in the vanilla extract, all-purpose flour, and sour cream until fully combined and the batter is smooth and homogeneous.
- Fill muffin cups: Evenly divide the batter among the prepared muffin cups, filling each about three-quarters full to allow space for slight rising.
- Bake: Bake the cheesecakes in the preheated oven for 18 to 22 minutes, or until the centers are just set but still slightly jiggly, indicating perfect doneness.
- Cool: Remove the pan from the oven and let the cheesecakes cool in the tin for 10 minutes, then transfer the mini cheesecakes to a wire rack to cool completely at room temperature.
- Chill: Place the cooled cheesecakes in the refrigerator for at least 2 hours to set fully, which enhances their texture and flavor.
- Serve with toppings: Before serving, optionally top the mini cheesecakes with fresh fruit, jam, or your favorite pie filling for added sweetness and visual appeal.
Notes
- These mini cheesecakes can be made ahead of time and frozen (without toppings) for up to one month; thaw in the refrigerator before serving.
- For a firmer texture, chill overnight instead of just 2 hours.
- Use paper liners designed for baking to prevent any sticking issues when removing cheesecakes.
- Ensure the cream cheese is softened to room temperature for a smoother batter and better texture.


