
There’s something truly magical about these sweet treats, and that’s exactly why you’ll love this Marbled Effect Candy Apples Recipe. Combining the crisp freshness of apples with a dazzling, swirled candy coating, this recipe turns simple apples into a stunning party showstopper. The multi-colored marbled candy shell isn’t just beautiful to look at—it’s also irresistibly crunchy and packed with nostalgic candy flavor that’ll delight both kids and adults alike. If you’ve been searching for a fun and eye-catching dessert to impress your friends or to elevate your seasonal celebrations, this Marbled Effect Candy Apples Recipe is your new go-to!

Ingredients You’ll Need
These ingredients are so simple yet essential, each bringing something unique to the final result. From the tart apples to the shiny candy coating, every element plays a pivotal role in crafting this delightful treat.
- Apples (6 medium, Granny Smith or Honeycrisp): The perfect balance of tartness and sweetness for a crisp base.
- Granulated sugar (2 cups): The foundation for the shiny candy shell that hardens beautifully.
- Light corn syrup (1/2 cup): Prevents crystallization, ensuring a smooth, glassy finish.
- Water (3/4 cup): Helps dissolve the sugar evenly as it cooks.
- Vanilla extract (1/2 teaspoon): Adds subtle depth and warmth to the candy flavor.
- Gel food coloring in two or more colors: Provides vivid, vibrant hues that make the marbled effect pop wonderfully.
- Wooden sticks (6): A handy grip for dipping and enjoying your candy apples.
- Cooking spray or parchment paper: Essential for letting the coated apples cool and set without sticking.
How to Make Marbled Effect Candy Apples Recipe
Step 1: Prepare Your Apples
Begin by washing your apples thoroughly to remove any wax coating that could prevent the candy from sticking. Pat them completely dry to ensure the syrup adheres well. Insert a wooden stick into the top of each apple, making sure it’s secure but not pushed too far through. Set these aside for dipping.
Step 2: Line Your Work Surface
Prepare a baking sheet by lining it with parchment paper or lightly spraying it with cooking spray. This will be where your apples rest and harden after dipping, so having a non-stick surface is key to keep them intact and easy to remove later.
Step 3: Make the Candy Syrup
In a medium, heavy-bottomed saucepan, combine the sugar, light corn syrup, and water. Stir gently over medium heat until the sugar has completely dissolved—this creates the smooth base for your candy coating. Clip a candy thermometer to the pan’s side, and let the mixture come to a boil without stirring. You’re aiming for the hard crack stage at 300°F, which usually takes about 15 to 20 minutes. This precise temperature ensures that the candy shell will harden with the perfect crisp snap.
Step 4: Add Flavor and Color
Once the temperature is reached, carefully remove the pan from the heat and stir in the vanilla extract for a gentle burst of flavor. Immediately divide your hot syrup into two or more heatproof bowls. Add different gel food coloring to each bowl, choosing colors that contrast nicely to create that stunning marbled effect.
Step 5: Create the Marbled Effect
To achieve the marbled look, drizzle one colored syrup into another without mixing them thoroughly. The syrup’s viscosity allows the colors to swirl naturally, creating gorgeous patterns that will coat your apples in an artistic candy shell.
Step 6: Dip the Apples
Take each apple by the stick and carefully dip it into the marbled candy mixture, gently turning to cover all sides evenly. Let any excess drip off before placing the apple onto the prepared baking sheet. Allow them to cool completely until the candy shell hardens into a glossy, crackling finish.
How to Serve Marbled Effect Candy Apples Recipe

Garnishes
To elevate your presentation, consider adding a few simple garnishes. A light sprinkle of edible glitter or shimmer dust can add whimsical sparkle that catches the light beautifully. You can also roll the apples briefly in crushed nuts or candy sprinkles before the candy sets for added texture and color contrast.
Side Dishes
While candy apples are fantastic on their own, pairing them with some mild accompaniments can help balance their sweetness. Think of serving them alongside a fresh cheese platter with mild cheeses like brie or cream cheese, or a bowl of salty popcorn for a sweet-and-salty snack experience. Fresh fruit slices such as ripe pears or juicy grapes offer a refreshing palate cleanser between bites.
Creative Ways to Present
Presentation can make your Marbled Effect Candy Apples Recipe truly unforgettable. Arrange the apples upright in a decorative wooden crate lined with paper shreds or straw for a rustic look. Alternatively, wrap each apple individually in cellophane tied with a colorful ribbon for gift-giving or party favors. If hosting a party, consider suspending a candy apple “tree” with branches or a stand, letting guests pluck their own vibrant treats.
Make Ahead and Storage
Storing Leftovers
If you happen to have any leftover candy apples, store them in a cool, dry place away from humidity. Wrapping each apple loosely in wax paper or keeping them in a single layer in an airtight container helps maintain their crisp candy coating. Consumption within two days is best to enjoy optimal texture and flavor.
Freezing
Freezing candy apples is not recommended as the moisture from thawing can cause the candy shell to become sticky or soft, ruining the crisp texture that makes this treat so delightful. For best results, plan to enjoy fresh whenever possible.
Reheating
Since these are coated in hardened candy, reheating isn’t advisable because it will melt and alter the texture of the candy shell. Instead, savor them as is, or try slicing to enjoy the contrast of crunchy candy with juicy apple inside.
FAQs
Can I use other types of apples for this recipe?
Absolutely! While Granny Smith and Honeycrisp are preferred for their perfect balance of tart and sweet and firmness, you can experiment with Fuji or Gala apples. Just be mindful that softer apples may not hold up as well under the candy coating.
Why should I avoid liquid food coloring?
Liquid food coloring can interfere with candy’s hardening process by adding moisture, causing the candy shell to become sticky or fail to set properly. Gel food coloring contains less moisture, so it preserves the candy’s texture and glossy finish beautifully.
How do I prevent the candy from crystallizing?
The light corn syrup is your best friend here—it interferes with sugar crystals forming, keeping the candy syrup smooth and shiny. Also, avoid stirring the syrup once it starts boiling, as that can encourage crystallization.
Can I make the candy syrup ahead of time?
This recipe is best made fresh because the syrup hardens as it cools. Preparing the syrup ahead of time will result in it becoming too thick to dip apples properly. If you want to prep in advance, wash and insert sticks into the apples beforehand.
How do I clean up leftover hard candy?
Soaking pots and utensils in hot water will soften any hardened candy, making cleanup much easier. Avoid scrubbing with abrasive materials to protect your cookware.
Final Thoughts
I can’t wait for you to try this Marbled Effect Candy Apples Recipe because it’s such a joyful way to add color and crunch to any occasion. From the captivating swirls of candy to the crisp, juicy apples, it truly brings a modern twist to a beloved classic. Whether you’re making these for a festive gathering or just a fun family treat, they’ll surely bring smiles and a whole lot of “oohs” and “aahs.” Go ahead and give this recipe a whirl—you’re going to love showing off your candy artistry!
Print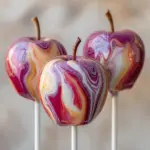
Marbled Effect Candy Apples Recipe
- Prep Time: 15 minutes
- Cook Time: 20 minutes
- Total Time: 35 minutes
- Yield: 6 candy apples
- Category: Dessert
- Method: Stovetop
- Cuisine: American
- Diet: Vegetarian
Description
These Marbled Effect Candy Apples are a festive and visually stunning treat perfect for Halloween or any party. Crisp apples coated in a hard crack sugar candy shell swirled with vibrant gel food coloring create a beautiful marbled appearance that’s as fun to make as it is to eat. With a crunchy candy coating flavored subtly with vanilla, this classic American dessert offers a perfect balance of tart and sweet and is ideal for gifting or enjoying as a colorful snack.
Ingredients
Apples
- 6 medium apples (Granny Smith or Honeycrisp work well)
- 6 wooden sticks
Candy Coating
- 2 cups granulated sugar
- 1/2 cup light corn syrup
- 3/4 cup water
- 1/2 teaspoon vanilla extract
- Gel food coloring in at least two colors (e.g., red and white or blue and pink)
For Preparation
- Cooking spray or parchment paper for drying
Instructions
- Prepare the apples: Wash and thoroughly dry the apples to remove any wax coating, which helps the candy adhere better. Insert a wooden stick into the top of each apple firmly to serve as a handle.
- Prepare the workspace: Line a baking sheet with parchment paper or lightly spray it with cooking spray to prevent sticking when the apples are placed to cool.
- Make the candy syrup: In a medium heavy-bottomed saucepan, combine the sugar, light corn syrup, and water. Stir over medium heat until the sugar dissolves completely to avoid grainy texture.
- Cook the syrup: Attach a candy thermometer to the saucepan and bring the mixture to a boil without stirring. Continue boiling until the thermometer reads 300°F (hard crack stage), about 15 to 20 minutes. This step ensures a hard, crackly candy shell.
- Add vanilla: Remove the pan from heat and carefully stir in the vanilla extract to infuse a delicate flavor.
- Create the marbled colors: Divide the hot syrup into two or more heatproof bowls. Add different gel food coloring to each bowl. Drizzle one colored syrup into another without stirring fully, allowing the colors to swirl and create a marbled effect.
- Coat the apples: Dip each prepared apple into the marbled candy syrup, turning to coat evenly. Allow excess syrup to drip off to avoid thick clumps.
- Cool and harden: Place the coated apples on the prepared baking sheet and let them cool at room temperature until the candy coating hardens completely, about 30 minutes.
Notes
- Avoid using liquid food coloring as it can alter the candy’s texture and prevent proper hardening.
- For added sparkle and festive flair, sprinkle edible glitter or shimmer dust over the candy while it is still sticky.
- Store the finished candy apples in a cool, dry place and consume within 2 days for optimal texture and freshness.

