
If you want to wow your loved ones this year with something both visually stunning and irresistibly delicious, the Valentine’s Day Pink Watercolor Cake Recipe is an absolute must-try. This cake is a romantic swirl of soft pink hues paired with a tender crumb and a luscious, creamy frosting that tastes as delightful as it looks. Whether you’re celebrating with a special someone or just treating yourself, this recipe perfectly captures the spirit of affection and sweetness in every bite.
Ingredients You’ll Need
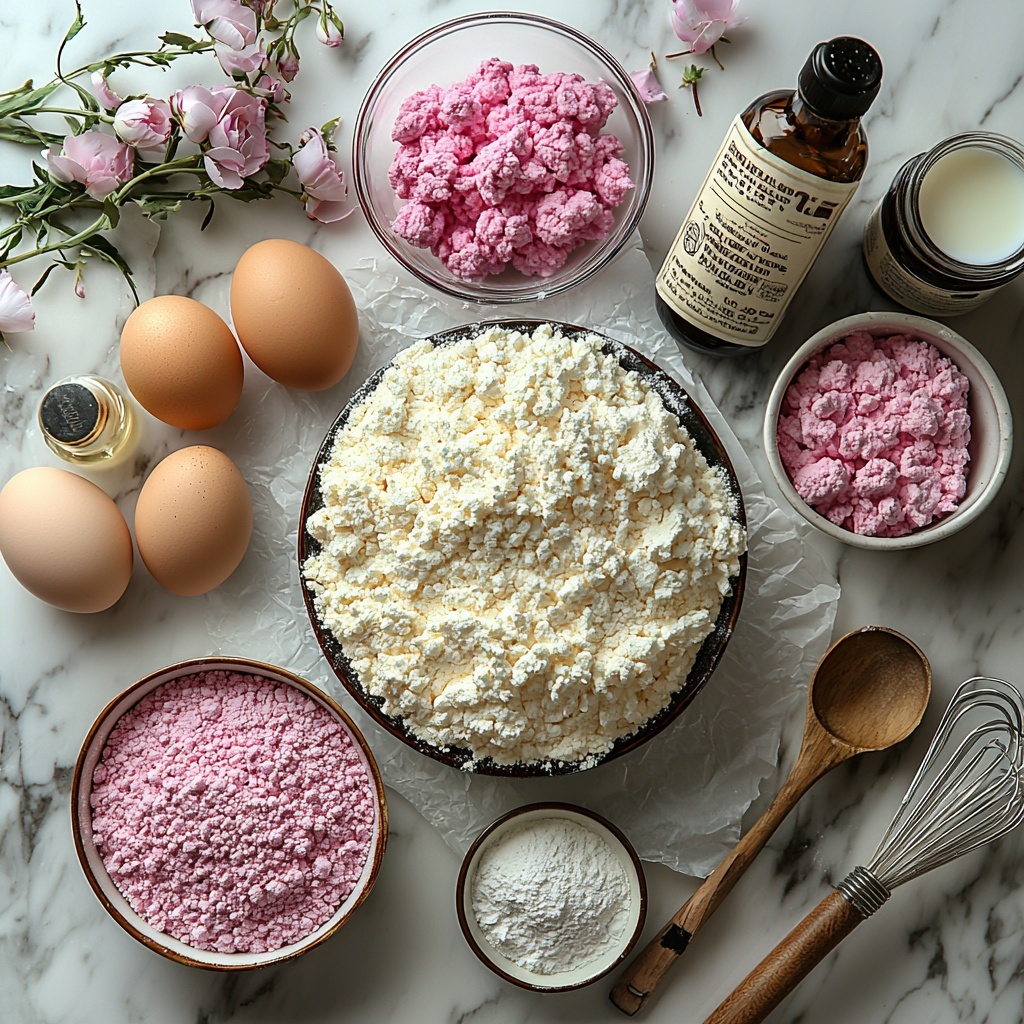
Gathering these simple yet essential ingredients is the first step toward creating a cake that’s bursting with flavor and dreamy pink tones. Each component plays a vital role, from the tender crumb of the all-purpose flour to the creamy frosting that crowns the cake with a perfect finish.
- 2 cups all-purpose flour: The backbone that gives the cake its soft, fluffy texture.
- 1 ½ cups granulated sugar: Provides sweetness and helps with moisture retention.
- 1 tbsp baking powder: The rising agent that makes the cake light and airy.
- ½ tsp salt: Enhances all the flavors in the cake.
- ½ cup unsalted butter, softened: Adds richness and moisture to the cake batter.
- 4 large eggs: Bind the ingredients and contribute to the cake’s structure.
- 1 tsp vanilla extract: Gives a warm, inviting aroma that complements the sweetness.
- 1 tsp almond extract: Adds a subtle nutty flavor, elevating the cake’s complexity.
- 1 cup whole milk: Keeps the batter moist and tender.
- Pink gel food coloring: Essential for achieving that stunning watercolor effect inside the cake layers.
- 4 cups powdered sugar, sifted: The base of the smooth and sweet frosting.
- ½ cup unsalted butter, softened: Makes the frosting creamy and spreadable.
- ¼ cup heavy cream: Gives the frosting a light, fluffy texture.
How to Make Valentine’s Day Pink Watercolor Cake Recipe
Step 1: Prep and Mix Dry Ingredients
Begin by preheating your oven to 350°F (175°C) and greasing two round cake pans to ensure the batter doesn’t stick. In a medium bowl, whisk together the all-purpose flour, baking powder, and salt. This ensures that the rising agent is evenly distributed and prevents any clumps or uneven texture in your cake.
Step 2: Cream Butter and Sugar
In a large mixing bowl, cream the softened butter and granulated sugar together until the mixture is light and fluffy—around three minutes of mixing. This step is crucial because it incorporates air that will give your cake its tender, airy crumb.
Step 3: Add Eggs and Extracts
Next, add the eggs one at a time to the creamed butter and sugar, beating well after each addition. Then, mix in the vanilla and almond extracts to infuse the batter with their wonderful, complementary flavors.
Step 4: Combine Dry and Wet Ingredients
Alternate adding the dry flour mixture and the whole milk into the wet ingredients, starting and ending with the dry. Mix gently until just combined—overmixing can make the cake tough, so be gentle but thorough.
Step 5: Create the Watercolor Effect
Divide the batter evenly into two bowls. Add pink gel food coloring to one portion, stirring until you achieve a vibrant pink shade. Then, dollop the pink and plain batters alternately into your greased cake pans. Use a knife or skewer to gently swirl the batters together, forming those beautiful watercolor patterns in the cake layers.
Step 6: Bake the Cake
Bake the cakes in the preheated oven for 25 to 30 minutes or until a toothpick inserted into the center comes out clean. Allow them to cool completely before moving on to frosting, so the layers don’t crumble and your icing glides on smoothly.
How to Serve Valentine’s Day Pink Watercolor Cake Recipe
Garnishes
To elevate this cake’s romantic aesthetic, try garnishing with fresh edible flowers, white chocolate shavings, or a sprinkle of pink sanding sugar. These little touches not only enhance the look but also add subtle texture and flavor that invite your guests to indulge.
Side Dishes
Pair this cake with lighter sides like fresh berries, a simple fruit salad, or a dollop of whipped cream. The tartness of berries balances the sweetness beautifully, making your dessert experience well-rounded and refreshing.
Creative Ways to Present
Try stacking the layers with a visible swirl of pink frosting on the outside or use a clear glass cake stand to showcase the watercolor interior. Serving individual slices on elegant plates with a drizzle of berry coulis can also make your celebration feel extra special and personalized.
Make Ahead and Storage
Storing Leftovers
Store leftover cake in an airtight container at room temperature for up to two days, or refrigerate for up to four days to keep it fresh. Bringing it back to room temperature before serving helps the flavors and texture shine.
Freezing
This cake freezes beautifully. Wrap individual cake layers tightly in plastic wrap, then a layer of foil, and store in the freezer for up to three months. Thaw overnight in the fridge for best results before frosting or serving.
Reheating
While cake is best enjoyed fresh, you can warm slices gently in the microwave for 10-15 seconds to bring back that soft, tender crumb without drying it out. Be cautious not to overheat to preserve moisture and flavor.
FAQs
Can I use regular liquid food coloring instead of gel?
Gel food coloring is recommended for the Valentine’s Day Pink Watercolor Cake Recipe because it provides intense color without thinning the batter. Liquid food coloring can dilute your batter, affecting texture.
Is almond extract necessary?
Almond extract adds a lovely subtle nuttiness that makes this cake special, but you can omit it if you have allergies or dislike the flavor. The vanilla extract will still deliver a wonderful aroma.
How do I get the perfect swirl pattern?
Use a skewer or knife to gently swirl the pink and plain batters just a few times after layering in your pans. Over-swizzling can muddy the design, so less is more to keep that pretty watercolor effect.
Can I make this cake gluten-free?
Substituting with a gluten-free flour blend that measures cup-for-cup can work, but texture might change slightly. Make sure to use a blend with xanthan gum for best results.
What kind of frosting is best for this cake?
The classic buttercream frosting made with powdered sugar, butter, and heavy cream is perfect here because it complements the light, tender cake while adding creamy sweetness that’s not overpowering.
Final Thoughts
Making the Valentine’s Day Pink Watercolor Cake Recipe is not just about baking a dessert; it’s about creating a joyful experience that fills your kitchen with warmth and pink-hued happiness. This cake brings together simple ingredients, beautiful presentation, and sensational taste, making it a wonderful centerpiece for any romantic occasion. I can’t wait for you to try it and fall in love with every bite!
Print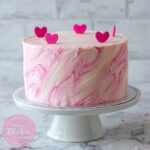
Valentine’s Day Pink Watercolor Cake Recipe
- Prep Time: 20 minutes
- Cook Time: 30 minutes
- Total Time: 50 minutes
- Yield: 12 servings
- Category: Dessert
- Method: Baking
- Cuisine: American
Description
Celebrate Valentine’s Day with this beautiful Pink Watercolor Cake featuring a moist, tender crumb swirled with delicate pink hues and topped with a luscious pink buttercream frosting. Perfect for a romantic occasion or any time you want a stunning, tasty dessert.
Ingredients
Cake
- 2 cups all-purpose flour
- 1 ½ cups granulated sugar
- 1 tbsp baking powder
- ½ tsp salt
- ½ cup unsalted butter, softened
- 4 large eggs
- 1 tsp vanilla extract
- 1 tsp almond extract
- 1 cup whole milk
- Pink gel food coloring
Buttercream Frosting
- 4 cups powdered sugar, sifted
- ½ cup unsalted butter, softened
- ¼ cup heavy cream
- Pink gel food coloring
Instructions
- Preheat Oven and Prepare Pans: Preheat your oven to 350°F (175°C). Grease two round cake pans thoroughly to prevent sticking.
- Combine Dry Ingredients: In a medium bowl, whisk together the all-purpose flour, baking powder, and salt until well combined.
- Cream Butter and Sugar: In a separate large bowl, cream the softened unsalted butter and granulated sugar together until light and fluffy, which should take about 3 minutes using an electric mixer.
- Add Eggs and Extracts: Beat in the eggs one at a time, ensuring each egg is fully incorporated before adding the next. Then mix in the vanilla extract and almond extract for aroma and flavor.
- Mix Dry and Wet Ingredients: Alternately add the flour mixture and the whole milk to the creamed mixture, starting and ending with the dry ingredients. Stir gently until just combined to avoid overmixing, which can make the cake dense.
- Create Pink and White Batters: Divide the batter equally into two bowls. Tint one bowl of batter with pink gel food coloring, and leave the other bowl plain. Pour dollops of each batter alternately into the prepared pans, then gently swirl them together using a knife or skewer to create a watercolor effect.
- Bake and Cool: Bake the cakes in the preheated oven for 25-30 minutes, or until a toothpick inserted in the center comes out clean. Allow the cakes to cool completely in the pans before removing and frosting.
- Prepare Buttercream Frosting: Beat the softened butter until creamy. Gradually add sifted powdered sugar while continuing to beat. Add heavy cream to achieve a smooth, spreadable consistency, then tint with pink gel food coloring to your desired shade.
- Assemble and Frost Cake: Once the cake layers are completely cool, frost the cake with the pink buttercream frosting, spreading evenly or creating decorative swirls as desired.
Notes
- Use gel food coloring for vibrant pink without altering the batter’s consistency.
- Be careful not to overmix the batter to maintain a light, fluffy texture.
- Allow the cake to cool completely before frosting to prevent melting the buttercream.
- The almond extract adds a subtle nutty flavor; omit if allergic or substitute with additional vanilla.
- For a gluten-free version, substitute all-purpose flour with a 1:1 gluten-free flour blend.
- The swirl pattern can be customized by how you layer the batter in the pans.
