
If you are on the lookout for a delicious and wholesome treat that’s as satisfying as it is simple to make, this Cereal Bars Recipe is an absolute game-changer. These bars perfectly balance the crispy crunch of rice cereal with the hearty chew of oats, all held together by a luscious blend of honey and peanut butter. Whether you need a quick breakfast on the go, a mid-afternoon energy boost, or a kid-friendly snack, these cereal bars deliver on taste, texture, and nutrition. Plus, the optional add-ins like chocolate chips or nuts add delightful bursts of flavor that make every bite memorable.

Ingredients You’ll Need
Gathering the right ingredients is the first step to creating your own batch of these irresistible treats. Each component plays a vital role, from bringing crunch and chew to sweetness and binding power, ensuring your bars come out just right every time.
- 3 cups crispy rice cereal: Adds lightness and airy crunch, keeping the bars fun and crisp.
- 1 ½ cups old-fashioned oats: Provides hearty texture and fiber, giving the bars a satisfying chew.
- ½ cup honey: Natural sweetness that also helps bind the bars together beautifully.
- ½ cup peanut butter (or almond butter): Provides richness, creaminess, and a subtle nutty flavor that ties everything.
- ¼ cup brown sugar: Adds a deep caramel-like sweetness and enhances that warm flavor.
- 1 teaspoon vanilla extract: Brings a fragrant sweetness that elevates the whole flavor profile.
- ¼ teaspoon salt: Balances the sweetness and enhances all other flavors.
- ½ cup mini chocolate chips (optional): Small bursts of melty chocolate that add fun and indulgence.
- ¼ cup chopped nuts or dried fruit (optional): Adds extra texture and a personalized twist to the bars.
How to Make Cereal Bars Recipe
Step 1: Prep Your Pan
Start by lining an 8×8-inch or 9×9-inch baking pan with parchment paper. Leave an overhang on the sides; this will make it much easier to lift out the bars once they are set. A well-prepared pan is the secret to neat, clean-cut bars!
Step 2: Combine Dry Ingredients
In a large mixing bowl, toss together your crispy rice cereal and oats. These two create the core crunch and texture that make your cereal bars so satisfying.
Step 3: Make the Binding Mixture
In a small saucepan over medium heat, gently warm your honey, peanut butter, and brown sugar. Stir continuously until everything melts together into a smooth, bubbling mixture—about 2 to 3 minutes. This is where the magic happens as the mixture becomes the glue that holds your bars together.
Step 4: Flavor and Combine
Remove the saucepan from heat and stir in vanilla extract and salt. Then, immediately pour this warm, aromatic mixture over your dry ingredients. Stir thoroughly so every oat and rice crisp is evenly coated in that luscious, sticky blend.
Step 5: Add Extras and Press
Allow the mixture to cool just slightly before folding in any optional ingredients like chocolate chips, nuts, or dried fruit—you want those extras to stay intact, not melt away. Firmly press the mixture into your prepared pan using a spatula or the flat bottom of a measuring cup. Don’t skimp on pressing—it ensures the bars hold their shape well after chilling.
Step 6: Chill and Slice
Pop your pan into the refrigerator for at least 1 hour to let the bars set fully. Once chilled, lift the bars from the pan using the parchment overhang and cut into squares or rectangles. Pat yourself on the back—you just made homemade cereal bars that are as tasty as they are satisfying!
How to Serve Cereal Bars Recipe

Garnishes
If you want to add a little extra pizzazz when serving these bars, sprinkle a few extra mini chocolate chips, chopped nuts, or even a light drizzle of melted peanut butter on top. It makes for a beautiful presentation and adds a fresh textural layer.
Side Dishes
These bars are perfect on their own but pairing them with a fresh fruit salad, a dollop of yogurt, or even a warm cup of tea or coffee creates a more rounded snack or breakfast experience. The sweetness and textures complement each other beautifully.
Creative Ways to Present
Cut your bars into fun shapes using cookie cutters for parties or pack them in colorful lunch boxes layered with parchment paper. You can also create mini layered parfaits by crumbling the bars and layering them with yogurt and fresh berries for a whimsical and delicious twist.
Make Ahead and Storage
Storing Leftovers
Store any extra cereal bars in an airtight container at room temperature for up to 5 days. This makes them an easy grab-and-go option throughout your busy week without losing their fresh taste or chewy crunch.
Freezing
If you want to keep these bars longer, freezing is a perfect option. Wrap individual bars tightly in plastic wrap or foil, then place them in a freezer-safe container or bag for up to 2 months. When ready, just thaw at room temperature or in the fridge.
Reheating
No need to reheat these bars since they are perfectly enjoyable cold or at room temperature. However, if you prefer a softer texture, a quick 10–15 second zap in the microwave will warm them slightly without making them messy.
FAQs
Can I make cereal bars without peanut butter?
Absolutely! You can substitute peanut butter with almond butter, sunflower seed butter, or even coconut butter to accommodate allergies or preferences. Just make sure whatever you use has a similar consistency to help bind the bars.
Are these cereal bars vegan?
By default, this recipe uses honey, which is not vegan. But you can easily make a vegan-friendly version by swapping honey for maple syrup or agave nectar and using dairy-free chocolate chips if including those.
What other mix-ins can I add to the bars?
Feel free to experiment with shredded coconut, flaxseeds, chia seeds, or a variety of dried fruits. These additions not only diversify flavors and textures but also boost the nutritional value of the bars.
How do I prevent the bars from falling apart?
The key is in thoroughly mixing and then firmly pressing the mixture into the pan before chilling. The sticky combination of honey and peanut butter acts as glue, so don’t skip the chilling time to let everything set properly.
Can these bars be made gluten-free?
Yes, as long as you use certified gluten-free oats and cereals, these bars can be enjoyed by those avoiding gluten. This makes them a versatile snack option for many dietary needs.
Final Thoughts
I can’t recommend this Cereal Bars Recipe enough as a go-to snack that’s both nourishing and delicious. It’s one of those recipes you’ll keep coming back to because it’s easy, adaptable, and celebrates wholesome ingredients in the best way. So grab your ingredients, get mixing, and treat yourself to homemade cereal bars that taste incredible and keep you fueled all day long!
Print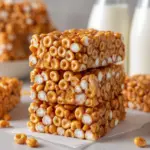
Cereal Bars Recipe
- Prep Time: 10 minutes
- Cook Time: 5 minutes
- Total Time: 1 hour 15 minutes
- Yield: 12 bars
- Category: Snack
- Method: No-Cook
- Cuisine: American
- Diet: Vegetarian
Description
These no-bake cereal bars combine crispy rice cereal and oats with a sweet and creamy mixture of honey, peanut butter, and brown sugar. Enhanced with optional chocolate chips and nuts, they make a perfect quick and healthy snack that requires no baking and minimal preparation.
Ingredients
Dry Ingredients
- 3 cups crispy rice cereal
- 1 ½ cups old-fashioned oats
- ¼ teaspoon salt
- ½ cup mini chocolate chips (optional)
- ¼ cup chopped nuts or dried fruit (optional)
Wet Ingredients
- ½ cup honey
- ½ cup peanut butter (or almond butter)
- ¼ cup brown sugar
- 1 teaspoon vanilla extract
Instructions
- Prepare the Pan: Line an 8×8-inch or 9×9-inch baking pan with parchment paper, leaving an overhang on the sides to allow easy removal of the bars later.
- Mix Dry Ingredients: In a large mixing bowl, combine the crispy rice cereal and old-fashioned oats evenly.
- Heat Wet Ingredients: In a small saucepan over medium heat, combine honey, peanut butter, and brown sugar. Stir constantly until the mixture becomes smooth and just starts to bubble, about 2–3 minutes.
- Add Flavorings: Remove the saucepan from heat and stir in vanilla extract and salt to the warm mixture to enhance flavor.
- Combine Mixtures: Pour the warm wet mixture over the dry ingredients and stir thoroughly until all the cereal and oats are evenly coated.
- Add Optional Ingredients: Let the mixture cool slightly, then fold in mini chocolate chips, chopped nuts, or dried fruit if desired for added texture and taste.
- Press into Pan: Transfer the mixture into the prepared pan and press firmly and evenly using a spatula or the back of a measuring cup to compact the bars tightly.
- Chill: Refrigerate the pan for at least 1 hour to allow the bars to set and firm up properly.
- Cut and Store: Lift the set mixture out of the pan using the parchment overhang and cut into 12 bars or squares. Store in an airtight container at room temperature up to 5 days or refrigerate for longer freshness.
Notes
- To make nut-free bars, substitute sunflower seed butter or a similar seed butter for the peanut butter.
- For a vegan version, replace honey with maple syrup and use dairy-free chocolate chips.
- Additional nutritious mix-ins like shredded coconut, flaxseeds, or chia seeds can be incorporated for extra fiber and omega-3s.


