
If you are craving a luscious dessert that combines the rich decadence of chocolate with the vibrant burst of cherries, look no further than this Chocolate Cherry No-Bake Cheesecake Recipe. It is a dream come true for cheesecake lovers who want a delicious, fuss-free treat that comes together without ever turning on the oven. Creamy, smooth, and perfectly balanced with a crunchy chocolate crust and sweet cherry topping, this recipe will quickly become a favorite for family gatherings or a special indulgence at home.
Ingredients You’ll Need
Every ingredient in this Chocolate Cherry No-Bake Cheesecake Recipe plays a vital role, whether it’s creating a buttery crust, a velvety filling, or that irresistible fruity finish. They are simple, easy to find, and come together to deliver incredible flavor and texture in every bite.
- 1 ½ cups chocolate cookie crumbs (like Oreos): These form the rich and crunchy base that holds everything together beautifully.
- ¼ cup unsalted butter, melted: Adds moisture and helps bind the cookie crumbs into a firm crust.
- 16 oz cream cheese, softened: The star of the filling, giving the cheesecake its signature smooth and creamy texture.
- ½ cup powdered sugar: Provides just the right amount of sweetness without graininess.
- 1 teaspoon vanilla extract: Enhances flavors with a warm, comforting hint that complements both chocolate and cherries.
- 1 ½ cups whipped topping or whipped cream: Lightens the filling, making it fluffy and airy for the perfect bite.
- ½ cup semi-sweet chocolate chips, melted and slightly cooled: Infuses the filling with rich chocolate flavor and a luscious texture.
- 1 (21 oz) can cherry pie filling: Offers a sweet-tart contrast that adds freshness and color to the dessert.
- Chocolate shavings or extra cherries for garnish (optional): Elevate the presentation with elegant finishing touches that impress any guest.
How to Make Chocolate Cherry No-Bake Cheesecake Recipe
Step 1: Prepare the Chocolate Crust
Start by combining the chocolate cookie crumbs with the melted butter in a medium bowl until every crumb is coated and the mixture resembles wet sand. Press this firmly into the bottom of a 9-inch springform pan to create a solid and delicious base. Pop it in the fridge to chill while you prepare the luscious filling—it helps the crust set perfectly for that crunch in every slice.
Step 2: Make the Creamy Chocolate Filling
Next, in a large bowl, beat together the softened cream cheese, powdered sugar, and vanilla extract until smooth and creamy. The key here is to avoid lumps for the ultimate silky mouthfeel. Gently fold in the melted chocolate chips, making sure the mixture turns a beautiful, inviting shade of chocolate brown. Finally, incorporate the whipped topping with a light hand to keep the filling fluffy and airy, like a dream.
Step 3: Assemble the Cheesecake
Spread the creamy chocolate filling evenly over the chilled chocolate crust, smoothing out the top with a spatula for an even layer. Spoon the cherry pie filling generously over the cream cheese layer, letting the glossy cherries nestle into the surface for that eye-catching pop of color and fruity sweetness. Cover the pan tightly with plastic wrap and transfer to the fridge to chill for at least 4 hours to set beautifully.
Step 4: Garnish and Serve
Once chilled, your Chocolate Cherry No-Bake Cheesecake Recipe is ready for its final touches. Whether with elegant chocolate shavings or extra cherries, these garnishes add a touch of flair and an extra layer of texture to the presentation. Release the cheesecake from the springform pan, slice, and prepare to wow everyone with each decadent forkful.
How to Serve Chocolate Cherry No-Bake Cheesecake Recipe

Garnishes
The magic of this cheesecake is in the details, so don’t be shy with your garnishes. Sprinkle delicate chocolate shavings on top for a sophisticated look, or scatter fresh cherries to amplify that juicy fruit flavor. You can even drizzle a little cherry syrup from the pie filling for added gloss and sweetness that will have everyone reaching for seconds.
Side Dishes
This dessert stands wonderfully on its own but can also be accompanied by a light dusting of powdered sugar on the plate or a small scoop of vanilla bean ice cream on the side. A cup of rich coffee or a glass of dessert wine pairs beautifully, balancing the richness of the cheesecake and enhancing the chocolate cherry flavor combo.
Creative Ways to Present
For a unique twist on presentation, serve individual portions in clear small glasses or jars layered with extra cherries or cookie crumbs on the bottom. This showcases every beautiful layer and keeps things fun and elegant. You could also add a sprig of fresh mint or edible flowers for a pop of color and freshness.
Make Ahead and Storage
Storing Leftovers
Store any leftover cheesecake in an airtight container in the refrigerator for up to 4 days. Because it’s no-bake, it retains its smooth texture beautifully without drying out, so you can enjoy the same fresh taste even after a couple of days.
Freezing
If you want to keep this dessert longer, it freezes well. Wrap the cheesecake tightly in plastic wrap and then place it in a freezer-safe container. Freeze for up to one month. When ready to enjoy, thaw overnight in the refrigerator to maintain the perfect creamy consistency without losing any of the luscious flavor.
Reheating
Since this is a no-bake cheesecake, reheating isn’t necessary or recommended. It’s best served chilled or at cool room temperature to keep that creamy texture and refreshing cherry topping just right.
FAQs
Can I use a different fruit instead of cherry pie filling?
Absolutely! While cherries are classic here, swapping in raspberry or strawberry pie filling offers a delicious variation that brings its own unique brightness to the chocolate base. Feel free to experiment with your favorite fruit flavors.
Do I have to use a springform pan?
A springform pan makes removing the cheesecake much easier because of its removable sides. However, if you don’t have one, you can use a regular pie dish lined with parchment paper for easy removal, just be a bit more gentle when serving.
Can I make this recipe vegan or dairy-free?
To adapt this cheesecake, try using dairy-free cream cheese, vegan butter, and nondairy whipped topping alternatives. Keep in mind the texture may differ slightly, but it can still be a delightful treat.
Is it possible to add chunks of chocolate or nuts inside the filling?
Yes! Folding in chopped chocolate or crunchy nuts like toasted pecans will add extra texture and a little surprise in every bite. Just be sure not to overmix, so the filling stays airy and light.
How long should I chill the cheesecake for best results?
While 4 hours will firm the cheesecake nicely, chilling overnight is ideal for a firmer texture and enhanced flavor melding. It gives the dessert its perfect sliceable consistency and allows those beautiful flavors to harmonize fully.
Final Thoughts
This Chocolate Cherry No-Bake Cheesecake Recipe is a total showstopper that combines simplicity with luxurious flavor and texture. Whether you’re an experienced baker looking for a quick dessert or a newbie wanting a failproof recipe, this cheesecake delivers delicious results every time. I encourage you to give it a try—you’ll love how effortlessly it turns everyday ingredients into a gorgeous and scrumptious treat all can enjoy.
Print
Chocolate Cherry No-Bake Cheesecake Recipe
- Prep Time: 20 minutes
- Cook Time: 0 minutes
- Total Time: 20 minutes plus at least 4 hours chilling
- Yield: 8 servings
- Category: Dessert
- Method: No-Cook
- Cuisine: American
- Diet: Vegetarian
Description
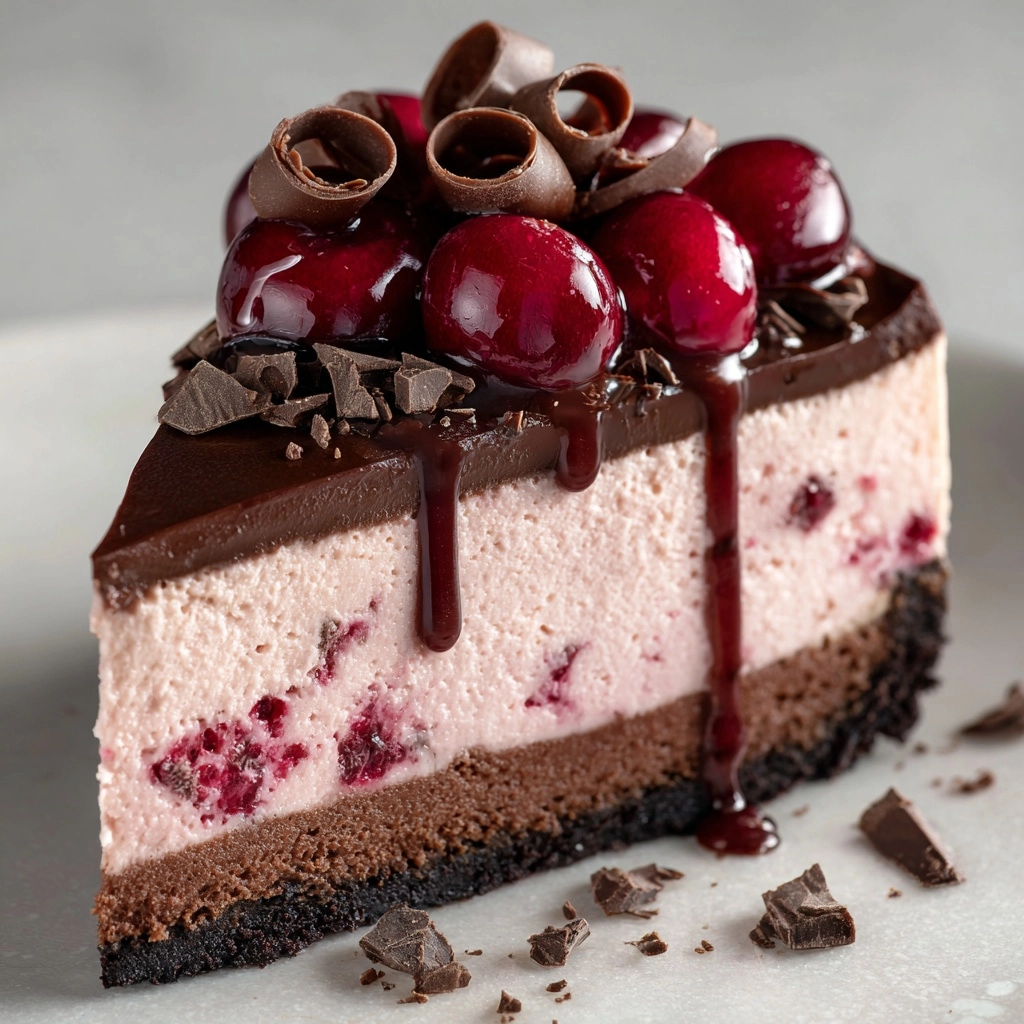
This Chocolate Cherry No-Bake Cheesecake is a luscious and easy-to-make dessert featuring a rich chocolate cookie crust, creamy chocolate-infused cheesecake filling, and a sweet cherry topping. Perfect for holidays or any special occasion, it requires no baking and can be prepared ahead to chill and set beautifully.
Ingredients
Crust
- 1 ½ cups chocolate cookie crumbs (like Oreos)
- ¼ cup unsalted butter, melted
Filling
- 16 oz cream cheese, softened
- ½ cup powdered sugar
- 1 teaspoon vanilla extract
- 1 ½ cups whipped topping or whipped cream
- ½ cup semi-sweet chocolate chips, melted and slightly cooled
Topping
- 1 (21 oz) can cherry pie filling
- Chocolate shavings or extra cherries for garnish (optional)
Instructions
- Prepare the crust: In a medium bowl, mix the chocolate cookie crumbs with the melted butter until combined. Press the mixture firmly into the bottom of a 9-inch springform pan, creating an even crust layer. Place the crust in the refrigerator to chill while you make the filling.
- Make the cheesecake filling: In a large bowl, beat the softened cream cheese, powdered sugar, and vanilla extract together until smooth and creamy using a mixer. Gradually fold in the melted chocolate until fully incorporated, then gently fold in the whipped topping or whipped cream to maintain a light texture.
- Assemble the cheesecake: Spread the prepared filling evenly over the chilled crust and smooth the surface with a spatula. Spoon the cherry pie filling evenly over the cheesecake layer to create a vibrant topping.
- Chill and set: Cover the cheesecake with plastic wrap or a lid and refrigerate for at least 4 hours, allowing the cheesecake to set firmly. For best results and a firmer texture, chill overnight.
- Serve: Before serving, optionally garnish the cheesecake with chocolate shavings or extra cherries for an elegant touch. Slice and enjoy your no-bake chocolate cherry cheesecake!
Notes
- For a firmer texture, chill the cheesecake overnight instead of just 4 hours.
- You can substitute dark chocolate chips for semi-sweet chocolate for a richer chocolate flavor.
- Swap cherry pie filling with raspberry or strawberry pie filling for a different fruit variation.

